Tuesday, February 11, 2014

Science Lab Sheets

They've just closed school for tomorrow, too. I'm afraid we might be in school until June. This hasn't happened since I lived in Massachusetts and we'd go back to school after Labor Day in September. Down in the south they go back in early August, sometimes in late July like we did this  year. Before today was called out we had already used up all of our official snow days and teachers were planning to go back for the first time after Memorial Day. Now we've got two more days out. With the possibility of more. Ugh.

It leaves me sitting on the couch watching episodes of Breaking Bad, Orange is the New Black, and House of Cards. All the while thinking about the lessons I had planned for today. We are knee deep in our unit on Sound and having a grand old time with some fun experiments, see previous post. Of course this is when I find a great resource stuffed in the back of my file cabinet on actual paper. It is a simple lab worksheet but it includes all of the great questions I want my students to think about.

I had planned to use it for another science sound experiment today. We were going to determine what type of material sound moves quicker through. Is it a solid or a gas? They would take a rubber band and hold it stretched out between thumb and forefinger. As they pluck it they would describe the sound. Then they would take a plastic cup and stretch the rubber band around the top and bottom and pluck it again. By the end they should determine that the vibrations from the motion of their fingers would produce a softer sound since the air molecules are further apart. The sound from the cup will be louder since the molecules of the cup will move faster carrying the sound to their ears.

Sounds plucky, right? {did you like my pun?} Well, that is waiting for us back in school when we return. Keep your fingers crossed that it isn't in June. Here's the sheet I was talking about.


You can pick it up for free here.

Sunday, February 09, 2014

Science - Sound Experiments

Do you ever have those teacher moments when you are actually surprised how well a lesson goes? Me too! Our county provided us with a suggested list of lessons and experiments to try for each of our Science units. Since we are doing Sound at the moment, I downloaded the unit plans. There were some great ideas in there, but I thought they were a bit short to carry an entire 45 min block of time. When it hit me. Why not turn them into stations and have the class rotate through them?

Woot!

I had three stations set up for the day, but quickly realized my 25 students would not work so well in such large groups. They need smaller groups to be more successful. So I came up with two more on the fly. Cuz that's how teachers roll, right?

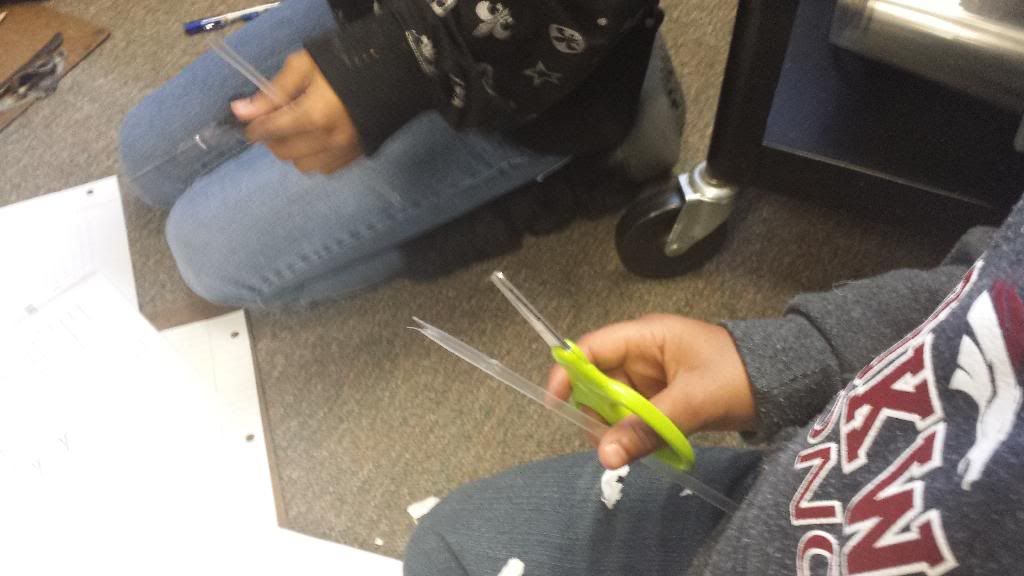
The first one from the county was to create a straw flute. The kids were to cut an arrow point into the bottom of a straw and then pinch the middle and cut a tiny hole there. As they blow through the flat end a whistling noise will be produced. There was a question sheet I had in a page protector at the station. Each child came to the group with pencil, paper, and clipboard. As they rotate through the stations they would draw a squiggly line underneath as they finish one. This saves on paper and copying.


The second was a weird one. It involved a wire hanger and two pieces of string. They were to tap the wire hanger with a pencil first to listen to it. They could tap the hanger with other objects and see if the pitch changes. Next they were to tie a 6" piece of string to each corner of the hanger, wrap their fingers around each bottom of the string and stick their fingers in their ears. They looked so goofy doing this, but they really got into it.

The final county suggestion was to use three glass jars filled with varying amounts of water. They were to tap each and describe the different sounds they heard. They also had to determine which jar made the loudest and softest sounds.


My two lessons were to look at some handmade musical instruments students have made in the past and describe materials and purpose for each of these instruments. This was to act as a preview of the Science Project I was about to send home for them. The other lesson worked with the computer. I turned on the media player and played a tune without sound showing the visualizations page. The students were to determine what was happening, why the bars got taller and shorter, why some always stayed short, and what type of pace the song was. Then they got to turn on the music and check their predictions. They loved doing this.


I let them bang away and talk through the stations for about 7 mins before I had them all stop and start the writing portion. Otherwise this group would use the whole time to tap, strike, hit, smash, throw the instruments and never do any serious thinking. We rotated the stations after 15 mins. We weren't able to get every child through every station, but the interaction and results I was seeing them write were really awesome. I told them we could save the stations for another day if we finish early.

Hurray for Science!

Tuesday, February 04, 2014

American Revolution Hanger People

Last year when I was hunting around for ideas to improve my American Revolution folder, I found this great blog post from Teaching in Room 6 where she detailed tons of fun ideas to enhance her curriculum. One of the things that she talked about was creating a Hanger Person. Her students picked one of the famous names from the period of turmoil as those colonists broke free from that pesky King George III. They wrote a report about their person and then went a step further and created a little visual display of their person using a hanger as the body shape.

I printed off a bunch of biographies from Mr. Nussbaum's site on American Peoples. His site is AWESOME! Seriously, if you haven't been there, RUN. Tons of great ideas and free activities to help you out. He covers all of the topics, so check it out. I laid the choices out on the floor and let them pick someone they were interested in.

My students were told to really concentrate on the period of their person's life that covered the years of the Revolution. That way they could narrow down their topic. I gave them a graphic organizer to use to help organize their notes. I had this great sheet that helped them break down the introductory paragraph better. I will look tomorrow to see if I can find it. But it basically had them focusing on their hook and summarizing the rest of their paper without giving too much away.

After the writing was done, I let them at the hangers. I have a ton of scrapbook paper from my previous creative life that they can rifle through to make their people. The tricky part was trying to get the head to stay on the hooky part of the hanger. Since the shoulders went over the upper edges of the triangular shape, I had to take the tape dispenser away from them and show them how to fold over a piece of paper to glue down on the back of the head with the hanger sandwiched between.

I had to send a few back to the drawing board to make their people 'more authentic'. They were starting to look like just some random person. I had them think what they could add to their person to show who they were. That's when they came up with adding in the Declaration and a quill pen for Mr. Jefferson. One of my girls added a huge snowball for Crispus Attucks from the Boston Massacre. Much better!

The project came out great. I just wish my class could complete these things a little faster. They take a long time for everything. I'm hoping my lesson on Jon Scieska's Battle Bunny will really spark some engines to race tomorrow!

Here's a shot of a few of my hanger people:


Monday, February 03, 2014

Snow Globe Writing

I was wondering if anyone was going to ask me what I meant a few posts back when I said I was taking pictures of my students as they came in all bundled up. I had a pretty sweet prize pack from my TpT store for those curious minds. But alas, no one took the bait.

I took those really great pictures of my students, printed and cut them out then had them design the interior of their snow globe to go along with their engaging writing piece. I bought some clear plastic plates at the grocery store and some Buffalo Glitter. It's not actually glitter, but more confetti. Still very aggravating as it got over everything. I put a spoonful of the shimmery stuff in the middle of their design and then hot glued the plate on top of it to create a snow globe.

You know I didn't come up with this on my own. Total JIVEY moment, of course!

Their story concepts ranged from giant flesh eating teddy bears that needed to be taken down with a chainsaw (no idea where they found one inside a snow globe, but okay), to the mysterious stranger giving them a snow globe and warning them not to shake it. Oops! All of them were creative and engaging stories to read, so I accomplished that message. We still need to work on those pesky capitals and understanding how to paragraph appropriately. I got them to indent! Wheee.

Here's a picture of my friend, Meghan's student results. I took mine down and sent them home before taking a picture.